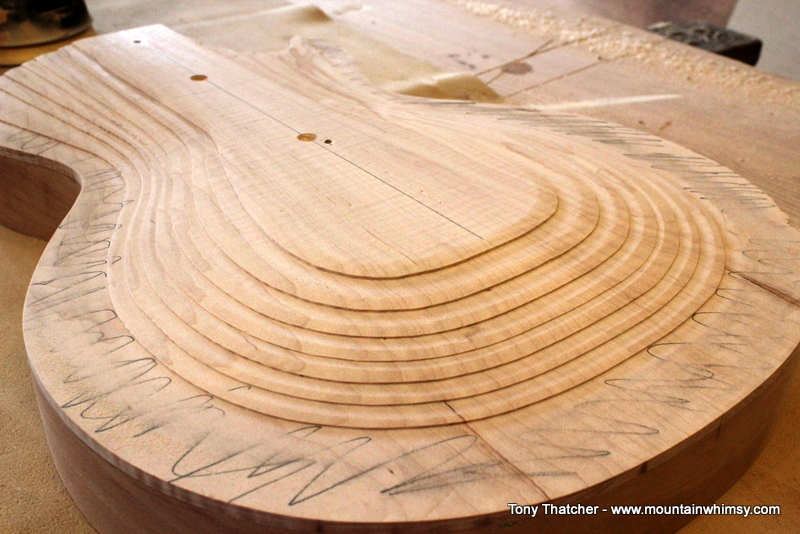
I’ve been playing a little catchup with the build blog. Some of these steps happen pretty quickly, but have a bunch of interesting mini-steps to get them done. The top carve on the guitar is one of those. Lots of curves, transitions, important angles, heights, etc., all with the goal of subtle elegance.

For me, the carved deck is probably the most compelling aspect of a Les Paul guitar. The curves across the top of the guitar need to flow and transition into both the curved sides and the angled neck. This was one of the more daunting processes in building a Les Paul. The flat top and straight neck of a Strat or Telecaster is certainly much easier to wrap your mind around building.
Luckily there are endless resources on the Net for building just about any type of guitar. There are a few people who have been kind enough to document complete builds, including critical details, templates, and process that make my life easier. Scott, who goes by the name ExNihilo on the MyLesPaul.com forum, is one of those folks. His build thread (link) has been invaluable to me. Thanks, Scott! In one of these posts I’ll put up a list of links that are helpful.
The top carve represents the interaction of a contours that define the curved surface. Much like contours on a topographic map, these contours represent lines of equal height above the base elevation of the guitar body. All the vintage Les Pauls were carved and shaped by hand, so there is no “correct” profile, only some good guidelines. Some Les Paul aficionados pull out the tape measure and calipers any time they get their hands on a vintage guitar. They are continually tweaking their dimensions and templates to represent something that is within the “normal” range of dimensions. The body template I am using is version 10 drawn by John Catto in 2006. And, luckily for me, ExNihilo has created an excellent set of top carve templates (links to templates) that make the top carve much easier.
The standard carve thickness in 7/16″. ExNihilo has created a set of 7 contours that represent 1/16″ steps in the deck. I used these to create seven templates, one for each step. These are attached one at a time, starting with the outermost (lowest) template and the router is used with a template bit to cut out each step.
The first cut is 7/16″ down.
Then the next template is attached and the process is repeated, this time cutting down 6/16″, leaving a 1/16″ step.
Repeat this for each of the seven steps and you end up with something that looks like terraced fields somewhere in Asia. I secure each template to the body using a couple of screws that are set in the pickup cavity area. I located all the holes in the same place so it is easy to register each template to the body.
In the next post I’ll show how to blend all of these steps together and cut the neck and pickup planes. Here’s a gallery showing the entire process.
7 Comments
-
Hy,
you could provide the templates from the top?Thanks!!
-
Author
These are pretty easy to find on the net. Here’s the link to ExNihilo’s templates.
Good luck!
-
Friend, answer me one more question? to the top you used how many “inches” of maple? Many Thanks.
-
-
-
***** Friend, answer me one more question? to the top you used how many “centimeters” of maple? Many Thanks.**********
-
Hi Tony,
Your build looks great. I am preparing for a build – always wanted an LP style guitar. I build an LP double cutaway and really want an archtop. I finally found the router templates online but cannot find the carving guides anywhere. Xnihilo’s links no longer work. Would you still have the second page of arching guides?Also do you know what the difference is between the Bartlett and Catto shapes?
Thanks,
Bob-
Hi Bob! Thanks for the compliment! You should find both pages via these links. I just tested them and they work.
http://www.gitarrebassbau.de/download/file.php?id=6082
http://www.gitarrebassbau.de/download/file.php?id=6081
As for difference between Bartlett and Catto, I really don’t think it makes a difference. Folks seem to love Bartlett’s plan set, but I believe Catto’s are free. From the experts, you can go out and measure any of the vintage LPs and never come up with the same numbers. Each was worked by hand, so each has a slightly different carve.Have fun! It’s a great project!
-
Hi Tony,
Perfect!! Interesting site – I have to work on my German. 🙂
Thanks,
Bob
-
-


